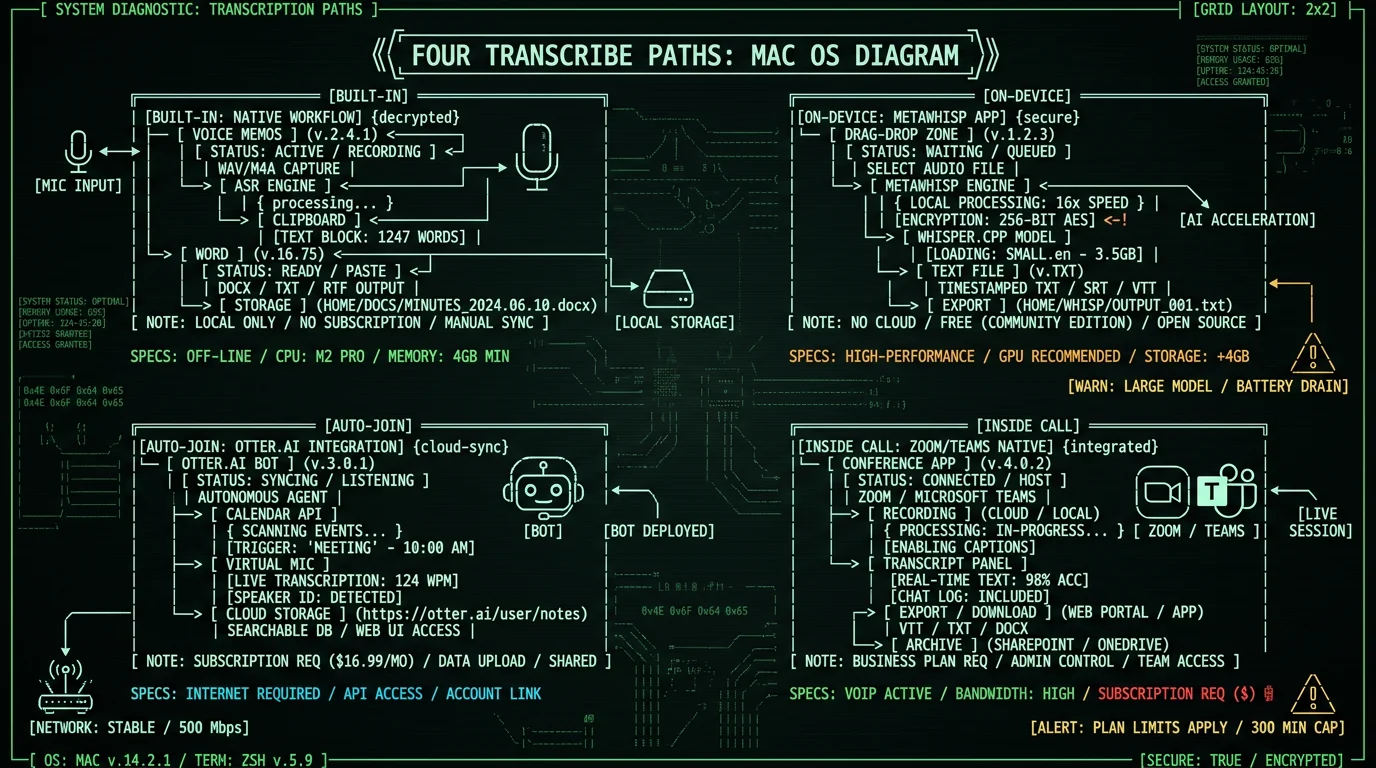
Which Method Should You Use for Meeting Minutes?
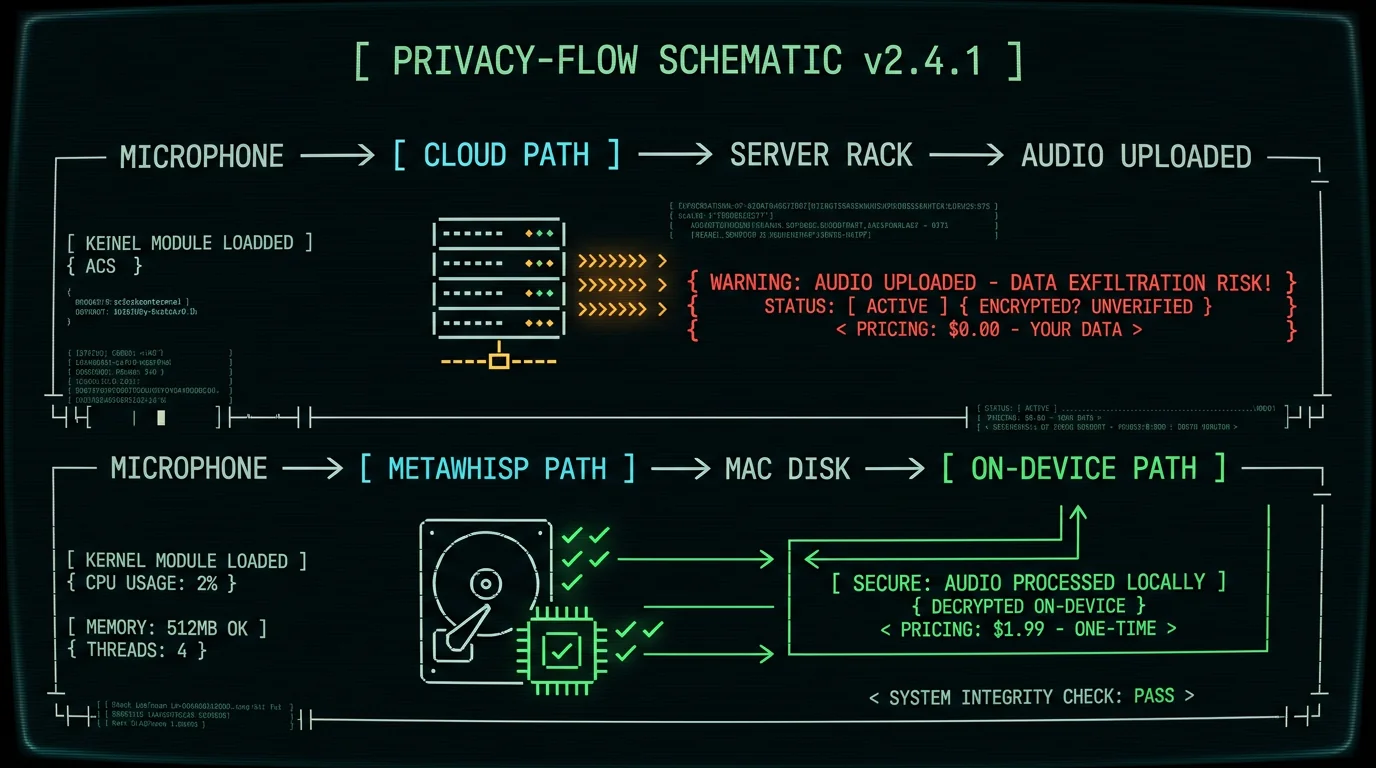
Three things decide it: how sensitive the meeting is, how many you run a month, and what you're willing to spend. Match yourself to one of these:- Confidential meetings (legal, HR, medical, board): Record locally, transcribe with MetaWhisp on-device. Audio never leaves your Mac. Free.
- Routine internal meetings, want AI summary + action items: Otter.ai auto-join. $16.99 per month. Cloud-based.
- Occasional meetings, already on Microsoft 365: Word M365 Transcribe with the recorded audio file. Already paid for.
- Already on Zoom Pro / Google Meet Workspace / Teams Premium: Use the built-in transcript feature inside the meeting platform.
Method 1: Record with Voice Memos, Transcribe in Microsoft Word
If you already have a Microsoft 365 subscription, this is the most integrated path. Voice Memos (built into macOS) records the meeting. Word for M365's Transcribe feature converts the audio file to a transcript inside a Word document with speaker labels and timestamps. Steps:- Open Voice Memos on Mac (Applications → Voice Memos)
- Click the red record button. Voice Memos uses your default microphone — make sure it's set to capture your speakers' audio too (use BlackHole or Loopback for system audio capture on Mac)
- Conduct your meeting. Voice Memos handles recordings up to several hours
- Click the red square to stop. The recording saves as an
.m4afile - Open Word for Mac (M365 subscription required)
- Click Home → Dictate dropdown → Transcribe
- Click Upload audio in the right pane
- Select your Voice Memos
.m4afile - Wait for transcription. Word's cloud-side processing typically takes 1-2× the audio length
- Click Add to document when complete. Choose with speakers, with timestamps, or plain text
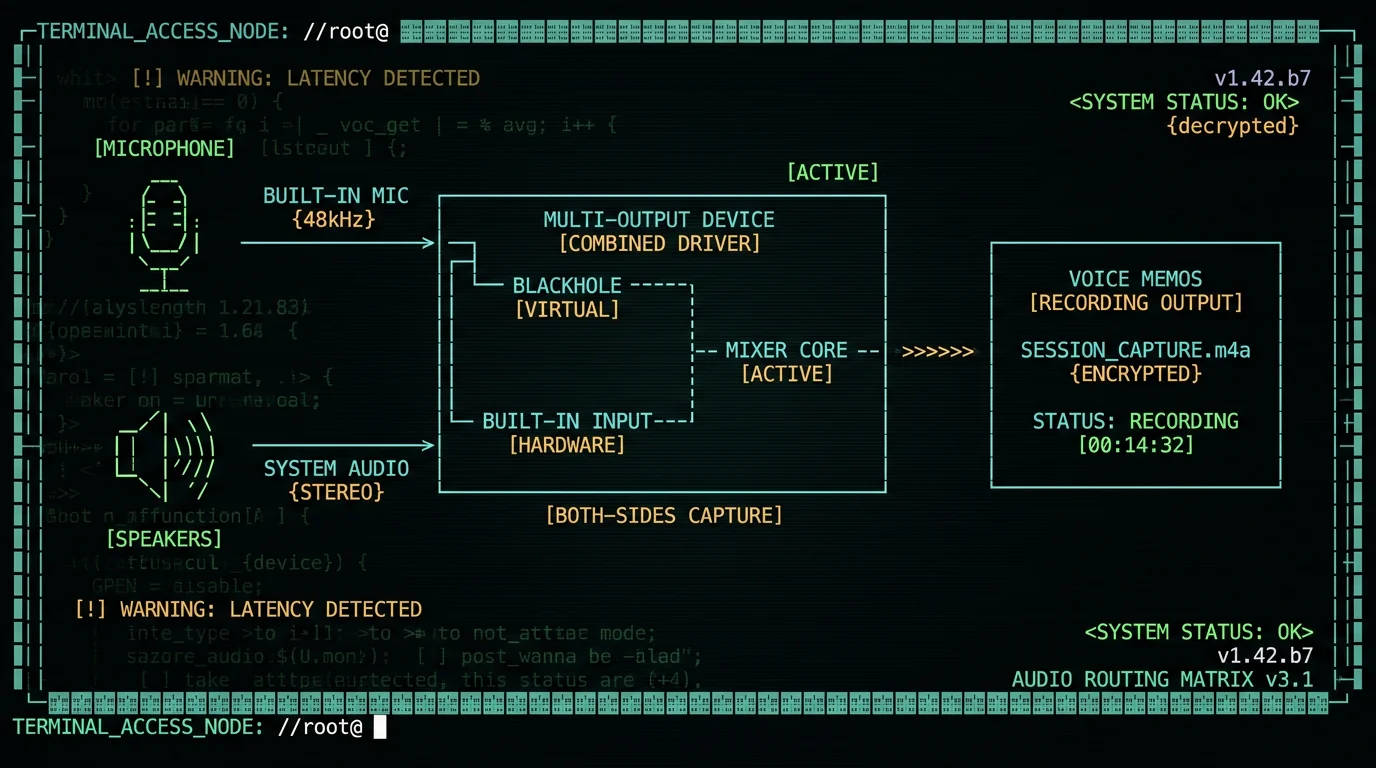
Pro tip: To capture both your voice and the meeting participants' audio on Mac, install BlackHole (free, open-source virtual audio driver). Set up a Multi-Output Device in Audio MIDI Setup that includes both your built-in mic and BlackHole, then select that device in Voice Memos. This captures both sides of the call without any special meeting platform support.
Method 2: Drop the Audio into MetaWhisp for Free On-Device Transcription
If you don't want to upload meeting audio to a cloud service — or your M365 quota is exhausted — MetaWhisp handles the same .m4a file locally on your Mac. No quota, no cap, no upload. Steps:- Record the meeting with Voice Memos (or any other recorder) following Method 1 steps 1-4
- Open MetaWhisp on your Mac
- Drag the
.m4afile directly into the MetaWhisp window - Wait for transcription. On M2 or M3 MacBook Air, a 1-hour recording transcribes in roughly 3-7 minutes
- Click Export in the toolbar
- Choose format: .txt, .docx, or .srt
- Save to your preferred location
Method 3: Let Otter.ai Auto-Join Your Meetings
If you want real-time transcripts with AI summaries and action items, Otter.ai is the dominant tool for meeting capture. The auto-join feature connects Otter to your calendar (Google Calendar, Outlook, or Microsoft 365), spots meetings on your schedule, and sends a bot to join Zoom, Google Meet, or Microsoft Teams calls automatically. Setup:- Create an Otter account at otter.ai (free Basic, Pro $16.99/month, Business $30/seat/month)
- Connect your calendar via OAuth in Otter's settings
- Enable OtterPilot auto-join for the calendars you want Otter to monitor
- Otter sends a bot to join each upcoming meeting automatically
- The bot appears in the meeting as a participant labeled "Otter.ai"
- After the meeting ends, Otter generates a transcript with speaker labels, AI-extracted action items, and a meeting summary
- The transcript is searchable in Otter's web interface and shareable via link or PDF export
For meetings where you can't have a visible third-party bot — legal depositions, HR conversations, executive sessions — Otter's auto-join isn't an option. Record locally with Voice Memos and transcribe afterward with MetaWhisp or Word.
Method 4: Use Built-in Transcripts in Zoom, Meet, or Teams
Each major meeting platform now ships its own real-time transcript feature on paid tiers. These are convenient if you already pay for the platform but each has tradeoffs.| Platform | Required tier | Storage | Speaker labels | AI summary |
|---|---|---|---|---|
| Zoom Cloud Recording | Pro $15.99/mo | Zoom cloud | Yes | Smart Recording add-on |
| Google Meet | Workspace Business Standard $14/user/mo | Google Drive | Yes | Gemini summary on Enterprise |
| Microsoft Teams Premium | Premium $10/user/mo on top of M365 | OneDrive/SharePoint | Yes | Copilot recap |
- Start the meeting on the platform
- Click More → Record / Transcribe (Zoom uses "Cloud Recording"; Google Meet uses "Start transcript"; Teams uses "Start recording & transcription")
- Conduct the meeting
- End the meeting
- The transcript appears in your platform's storage (Zoom cloud, Google Drive, OneDrive) within 5-30 minutes depending on the meeting length
- Download as .vtt, .txt, or .docx depending on platform
How Do I Capture Both Sides of the Conversation on Mac?
A meeting recording is only useful if you can hear all participants. Voice Memos and most third-party recorders only capture your microphone by default — the audio coming from your speakers (the other participants' voices) is not recorded. Three workarounds:- BlackHole (free, open-source) — Creates a virtual audio device that captures system audio. Combine with your built-in microphone via Audio MIDI Setup's Multi-Output Device to capture both sides in one recording.
- Loopback by Rogue Amoeba ($109 one-time) — Same virtual audio device concept but with a polished GUI and fewer setup steps.
- Meeting platform recording — Zoom, Meet, Teams all capture both sides natively because they have access to all participants' audio streams server-side. If you can use the platform's recording feature, that's the simplest.
What's the Cheapest Way to Transcribe Meetings?
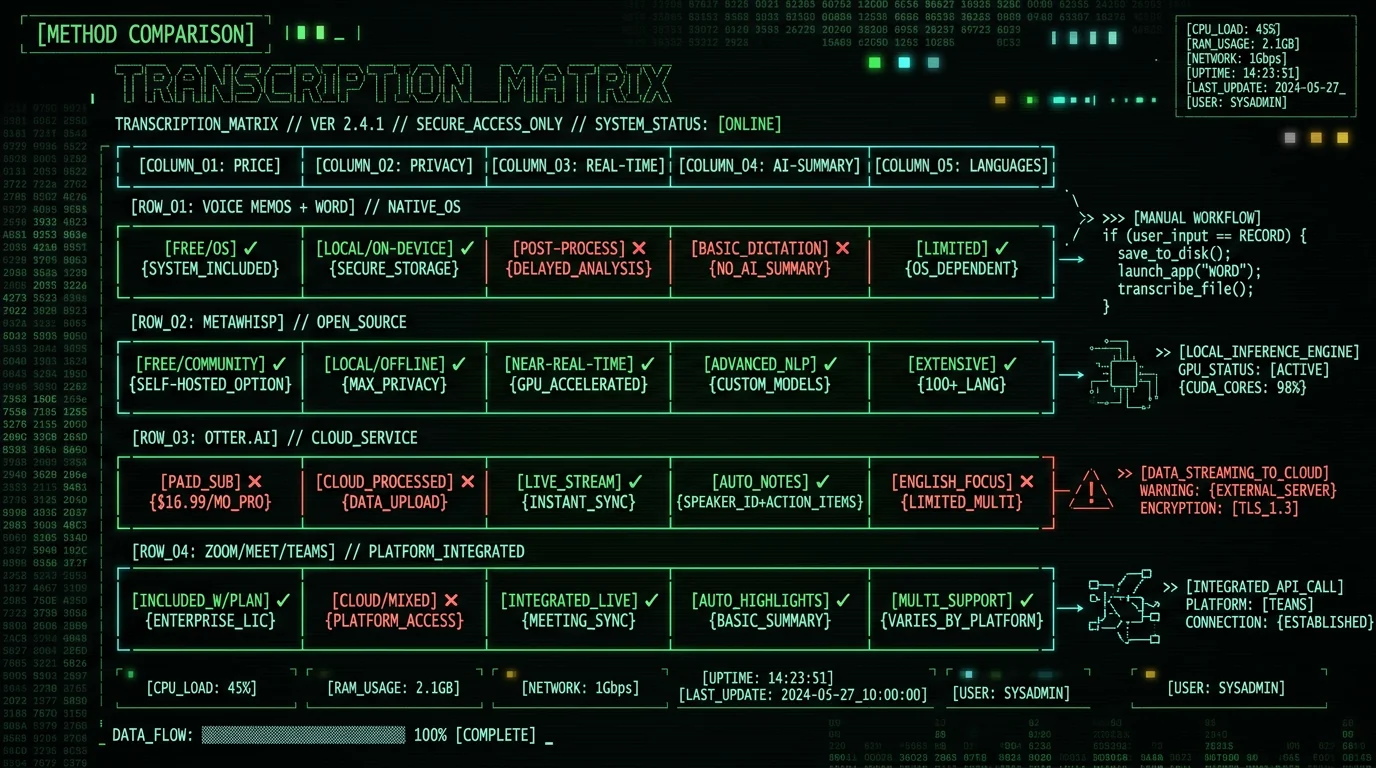
Cost comparison for transcribing 4 meetings per week (about 16 hours per month of audio):| Method | Cost / month | Cost / year | Notes |
|---|---|---|---|
| MetaWhisp on-device | Free | $0 | No cap, no subscription |
| Word M365 Transcribe | Already paid | Already paid | 5-hour monthly cap may cut you off |
| MacWhisper one-time | — | €64 once | Free tier available; file transcription plus system-wide dictation (macwhisper.com, checked 10 Aug 2026) |
| Otter.ai Pro | $16.99 | $100 (12 × $8.33/user/mo annual) | Auto-join + AI summaries |
| Zoom Pro | $15.99 | $192 | Includes Cloud Recording |
| Google Meet Workspace | $14/user | $168/user | Transcript via Workspace Business |
| Teams Premium | $10/user (+M365) | $120/user (+M365) | Add-on to existing M365 |
| Rev human transcription | Per-minute | $1.50/min × 60 min × 16 = $1,440 | For perfect-accuracy mandates only |
- Real-time captions during the meeting — only Zoom, Meet, Teams, or Otter offer this
- Auto-extracted action items — Otter and platform-side AI summaries
- Multi-speaker diarization for 5+ person meetings — Otter does this best
- Searchable shared transcript library across the team — Otter Business or Teams Premium
Will the Other Participants Know I'm Recording?
Two-party consent laws in many US states and most of the EU require that all meeting participants be informed when a meeting is being recorded. The specific rules vary by jurisdiction, per U.S. Department of Justice electronic surveillance guidance. Practical guidance:- Announce the recording at the start of the meeting. Get verbal consent. Note it in the meeting agenda.
- Use the platform's built-in recording indicator when available. Zoom, Meet, and Teams all display a recording indicator that's visible to all participants.
- If using local recording with Voice Memos or BlackHole, there is no automatic notification — you must verbally disclose.
- Otter's bot appears in the meeting as a visible participant, which provides natural disclosure.
How Do I Find Action Items in a Meeting Transcript?
Once you have the raw transcript, the next step is usually extracting decisions, action items, and follow-ups. Three options:- Manual review — Read the transcript, highlight action items, copy to your task manager. Tedious but free and accurate.
- AI summarization with ChatGPT/Claude — Paste the transcript into your preferred LLM with a prompt like "Extract action items, decisions, and follow-ups from this meeting transcript". Costs pennies via API or use the free web UI.
- Built-in AI features — Otter.ai's AI summaries, Zoom Smart Recording, Google Meet Gemini Summary, Microsoft Copilot recap. Each platform's quality varies; Copilot recap and Otter generally produce the best action-item extraction.
What File Formats Should I Use for Meeting Transcripts?
Three common formats with different strengths:- .docx (Word) — Best for sharing with stakeholders who want to read the transcript in a familiar interface. Supports speaker labels, timestamps, comments, and tracked changes. Can be edited collaboratively in Word, Google Docs, or Pages.
- .txt (plain text) — Best for archiving and feeding to LLMs. Smallest file size. No formatting metadata. Easy to grep, search, and process programmatically.
- .vtt or .srt (subtitle formats) — Best for syncing transcripts to the original recording. Each line includes a timestamp range. Useful when you need to verify a quote against the original audio.
Frequently Asked Questions About Meeting Transcription
What is the best way to transcribe a meeting on Mac?
The best method depends on three factors: how sensitive the meeting content is, how many meetings you transcribe per month, and your budget. For confidential meetings, record locally with Voice Memos and transcribe with MetaWhisp on-device for free with no cap. For routine internal meetings with AI summaries, use Otter.ai auto-join at $16.99/month. For occasional meetings with existing Microsoft 365, use Word's built-in Transcribe feature (5-hour monthly cap).
Can I transcribe meeting minutes for free on Mac?
Yes. Voice Memos (built into macOS) plus MetaWhisp (free download) is a fully free workflow. Record the meeting with Voice Memos, drop the .m4a file into MetaWhisp, get a transcript on-device with Whisper large-v3-turbo. No subscription, no quota, no cloud upload. Apple's macOS Dictation is also free but doesn't handle long meeting audio well.
How do I record both sides of a Zoom meeting on Mac?
Install BlackHole (free, open-source virtual audio driver), then create a Multi-Output Device in Audio MIDI Setup that combines your built-in microphone and BlackHole. Set this device as the input in Voice Memos. The recording will capture both your voice and the other participants' voices. Alternatively, use Zoom's built-in Cloud Recording feature on Zoom Pro, which captures all sides natively.
Is Otter.ai HIPAA-compatible for medical meetings?
Only the Otter Business tier ($30/seat/month) offers a Business Associate Agreement on request, making it HIPAA-eligible. The free Basic tier and the paid Pro tier do not offer BAAs and are not HIPAA-compatible for ePHI. For medical meeting transcription, either upgrade to Otter Business with signed BAA or use on-device tools like MetaWhisp that don't transmit audio to any vendor at all. See our HIPAA speech-to-text guide for compliance specifics.
How long does it take to transcribe a 1-hour meeting?
Depends on the method. MetaWhisp on-device transcribes a 1-hour meeting in 3-7 minutes on M2 or M3 MacBook Air. Word M365 Transcribe takes 30-90 minutes including upload and cloud queue. Otter.ai is real-time during the meeting (no post-processing wait). Zoom Cloud Recording transcripts are typically ready 5-15 minutes after the meeting ends.
How accurate is Mac meeting transcription?
Whisper large-v3-turbo (used by MetaWhisp and most desktop Whisper apps) scores 2.76% WER (about 97%) on clean read English in our LibriSpeech test-clean benchmark, comparable to the model figures published by other Whisper-based services. Real meeting audio is harder than a clean benchmark: multi-speaker calls with overlapping voices, heavily accented English, and domain-specific vocabulary (medical, legal) all raise the error rate. We don't separately benchmark those conditions, so treat clean single-speaker audio as the best case and always review high-stakes transcripts before relying on them.
Can I transcribe a meeting recorded in another language?
Yes. Whisper large-v3-turbo supports 99 languages and auto-detects the language from the first 30 seconds of audio. Drag a Spanish, French, Mandarin, Japanese, or Russian meeting recording into MetaWhisp and it produces a transcript in the original language. For translation to English, MetaWhisp's Translate mode (Pro tier or own API key) handles this in one step.
Do I need to ask permission before recording a meeting?
Yes in many jurisdictions. Two-party consent laws in California, Florida, Illinois, Maryland, Massachusetts, Montana, Nevada, New Hampshire, Pennsylvania, and Washington require all parties to consent to recording. Most of the EU follows similar consent requirements under GDPR. Announce the recording at the start of the meeting, get verbal consent, and note it in the agenda. For external meetings, explicit per-meeting consent is the safer practice.
About the Author
Andrew Dyuzhov is the solo founder and CEO of MetaWhisp, a free on-device voice-to-text app for macOS that runs Whisper large-v3-turbo on Apple Neural Engine. He built MetaWhisp to give knowledge workers a way to transcribe meetings, dictation, and audio files without uploading anything to a vendor's cloud. The procedures in this article reflect his hands-on testing of Voice Memos, Word M365 Transcribe, Otter.ai auto-join, and Zoom Cloud Recording on his M3 MacBook Air. Connect on X or GitHub.
Related Reading
- Meeting Transcription Without a Bot on Mac — privacy-first alternatives to Otter's auto-join
- How to Transcribe an Audio File in Word on Mac — Method 1 deep-dive
- Zoom Transcription on Mac in 2026 — built-in vs private local methods
- HIPAA-Compliant Speech-to-Text on Mac — compliance requirements for medical meetings
- Voice-to-Text for Lawyers on Mac — privilege-protected meeting transcription
